
Building a workflow
Where: Select the Workflow Builder icon in the sidebar, then New Workflow.
What a workflow is
Section titled “What a workflow is”A workflow automates work in your office so no one has to remember it. You set it up once; then, whenever a trigger event happens — an appointment is scheduled, an appointment breaks, a procedure is completed — Teamio runs one or more actions automatically (text the patient, email them, create a task), filtered by the rules you define.
The shape is always the same: one trigger → one or more actions.
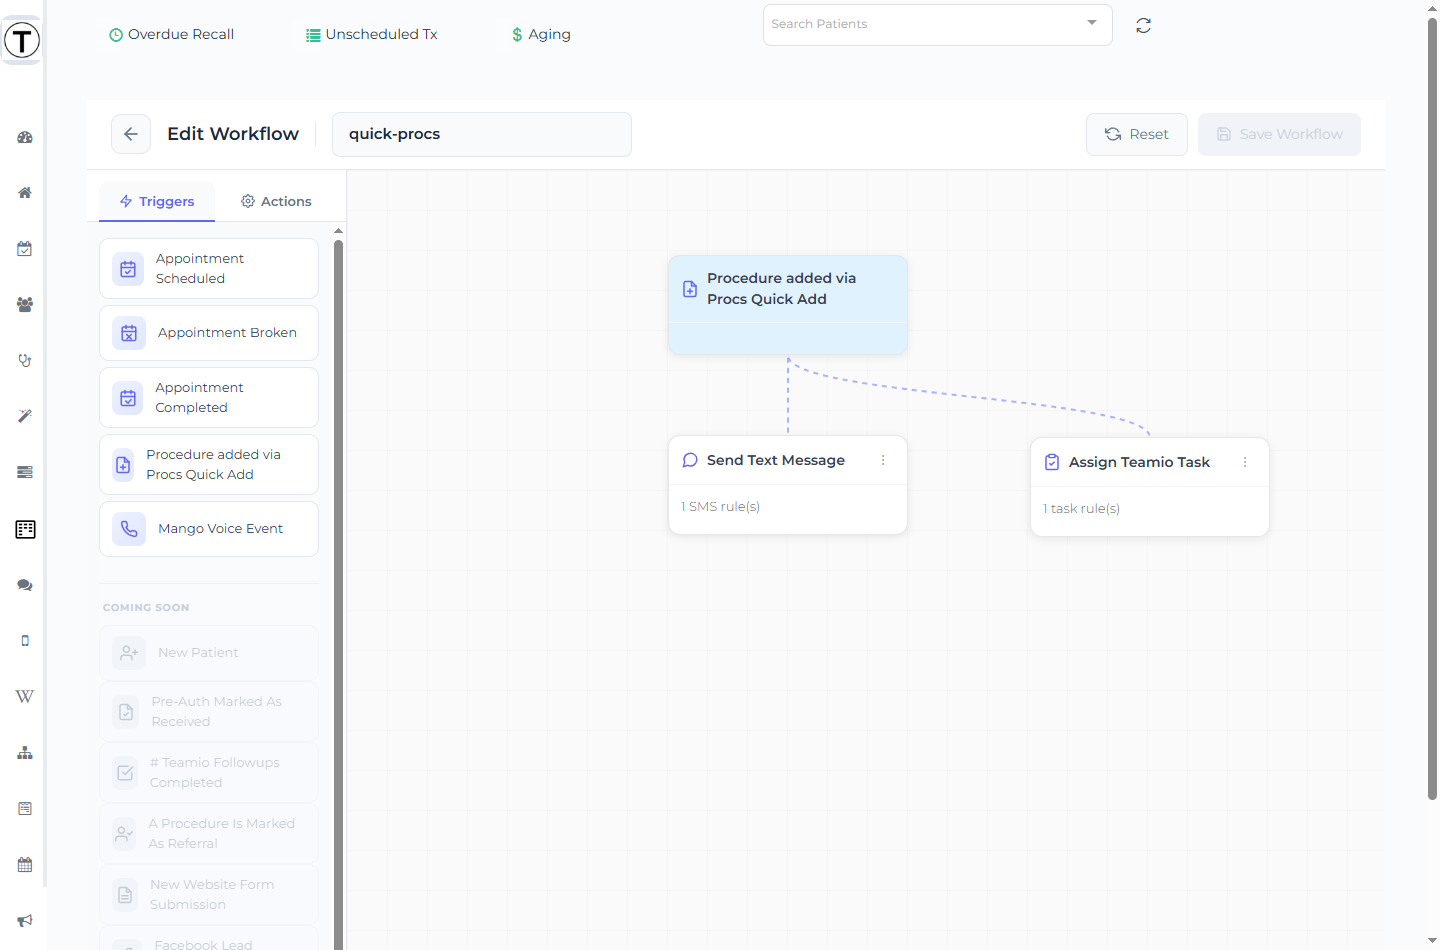
The builder layout
Section titled “The builder layout”- Left palette — two tabs, Triggers and Actions, each listing the available blocks. A Coming Soon group at the bottom of each tab shows blocks that aren’t selectable yet.
- Canvas — the dotted grid where nodes live. Before you add anything it shows an empty state: Start building your workflow / Drag a trigger from the left panel to get started.
- Header bar — a back arrow, a label that reads Create Workflow (or Edit Workflow when editing), the workflow name field (Enter Workflow Name), Reset, and Save Workflow. When you edit a workflow that’s currently inactive, an Activate button also appears here.
The Save Workflow button stays disabled until you make a change, and reads Saving… while it’s working.
- Select New Workflow to open the Create New Workflow modal — a Quick Start from Template grid plus Create from Template and Start from Scratch. Choose a template or Start from Scratch; the builder opens in a new browser tab. (You can also start from a card in the Suggested Workflows section. See Quick-start templates and suggestions.)
- Enter a name. Names allow letters, numbers, dashes, and underscores only — no spaces — must be 44 characters or fewer, and must be unique on your site. Use
new-patient-welcome, notNew patient welcome(a space fails validation). - Add a trigger — from the Triggers tab, drag one onto the canvas. There’s exactly one trigger per workflow, and each trigger can only be used by one workflow site-wide. See the triggers reference.
- Add one or more actions — switch to the Actions tab and drag out Send Text Message, Send Email, or Assign Teamio Task, connecting each to the trigger. (More actions appear under Coming Soon.)
- Configure each action — select an action node (or its ⋮ button) to open its settings sidebar, and fill in its rules (covered below).
- Select Save Workflow. If the workflow is already active, saving deploys the changes immediately (Workflow saved and deployed successfully!). A new or paused workflow saves but does not run until you Activate it (header button) or flip its toggle on the list.
Connecting and arranging nodes
Section titled “Connecting and arranging nodes”- Snap-to-connect — drag an action block near another node and a pulsing Drop to connect indicator appears; releasing wires the connection automatically.
- Manual wiring — use the small connection dots on a node’s top and bottom edges to draw a link yourself.
- Delete a node — hover the node and select the X (or use Delete Node in its settings panel). Teamio confirms: Are you sure you want to delete this block? Any configured settings will be lost.
- Reset — clears the entire canvas after the confirm Are you sure you want to reset the workflow? All unsaved changes will be lost. Reset does not revert to your last save — it empties the canvas.
- Leaving with unsaved changes — navigating away or closing the tab prompts You have unsaved changes. Are you sure you want to leave?
Trigger settings
Section titled “Trigger settings”Some triggers have their own settings. Mango Voice Event has an Event Type dropdown (today the only option is Missed Call) — select the node to open it. See the triggers reference.
One or many actions — parallel vs sequential
Section titled “One or many actions — parallel vs sequential”A trigger can drive several actions, and how you wire them decides the order:
- Parallel — actions connected straight to the trigger run all at once (each is an independent branch). Most workflows are parallel: when an appointment is scheduled, text the patient and create a front-desk task at the same time. Because each trigger can only belong to one workflow, parallel actions are how you do several things off one event.
- Sequential — chain one action after another (connect action → action) and they run in order, one finishing before the next begins. Use this when a later step depends on an earlier one.
Configuring an action: rules
Section titled “Configuring an action: rules”Each action opens a settings sidebar on the right. Its footer always has Delete Node, Cancel, and Save Changes. Inside, Send Text Message, Send Email, and Assign Teamio Task are each configured with a table of rules, where each row says “for these procedure codes, do this.” Select Add Rule (a plus icon) for as many rows as you need, and the X at the end of a row to remove one — so one workflow handles many procedures (crown patients get crown info; extraction patients get extraction info):
- Send Text Message — each rule is Proc Code → Template → Send When, plus an optional For New Patients Only filter. See Action: send a text message.
- Send Email — same shape as SMS, with read-only sender fields on top. See Action: send an email.
- Assign Teamio Task — each rule is Proc Code → Assign To → Description → Due Date → Attach Wiki? → Tags; its card-layout add button reads Add Task Rule. See Action: assign a Teamio task.
- Kanban — put a card on one of your Kanban boards automatically. Pick the Proc Codes that should trigger it (leave them empty and it runs for every procedure — Teamio asks you to confirm before saving that), then the Kanban Board, the Column for the new card, and the card action (Add New Card is the usual one — you can also move or update an existing card). Give the card a Title, Description, and Tags. The patient’s name travels with the card, so procedure completed → card appears on your follow-up board with no one touching the board. Bonus: if the board has email alerts set up and the workflow’s tag matches, the alert email goes out too — the card and the heads-up in one automation.
Select Save Changes in the panel to write its rules back onto the node, then Save Workflow to commit the whole thing.
Actions and triggers coming soon
Section titled “Actions and triggers coming soon”The palette lists blocks that aren’t selectable yet under Coming Soon, so you can see what’s on the way:
- Coming soon triggers: New Patient, Pre-Auth Marked As Received, # Teamio Followups Completed, A Procedure Is Marked As Referral, New Website Form Submission, Facebook Lead Generated, Google Lead Generated.
- Coming soon actions: Create an Open Dental Popup, Mail Letter, Wait, Send Slack Message, Create a Follow-up for Prospective Lead, Send a Form.
Troubleshooting
Section titled “Troubleshooting”Save Workflow won’t enable
Section titled “Save Workflow won’t enable”The button stays disabled until you change something. Make an edit (name, a node, a rule) and it activates.
Saving showed an error toast
Section titled “Saving showed an error toast”Save validates three things: the workflow must have a trigger (Workflow must have a trigger), only one trigger, and at least one action (Workflow must have at least one action. Add an action block after the trigger.). Add what’s missing and save again.
I saved but it isn’t running
Section titled “I saved but it isn’t running”A new or paused workflow saves without running. Select Activate in the builder header, or flip its toggle to Active on the list. See Pausing and editing a workflow.