
Practice Pulse overview
Practice Pulse is your day on one screen: a live patient-flow board that tracks every patient from the moment they check in, through the operatory they’re seated in, to the moment they check out — plus a digital route slip the front desk uses to close out each visit. It answers “who’s here, who’s waiting, and which chairs are open?” without anyone walking the hallway to look. The board reads your patients’ Open Dental appointment statuses and places each patient in the right column automatically — and when you move a patient on the board, Teamio writes the new status back to Open Dental, so there’s no double entry.
What it shows: a Check-in column (Arrived / Ready), one column per operatory, a Check-out column, and an Alerts panel — with at-a-glance card icons for balances, recall, ortho benefits, tasks, and birthdays.
What the team does with it:
- See the floor at a glance — who’s waiting, who’s in a chair, which rooms are open, and how long anyone has been waiting.
- Seat and check out patients — drag a card into a room or to Check-out; statuses sync back to Open Dental both ways.
- Close out every visit on a route slip — recall confirmed, balance flagged, next appointment planned, and a follow-up task assigned before the patient leaves (see the checkout route slip).
- Ping a teammate to a room — instant alerts with a sound and a browser notification (see pinging a room).
- Review the day — the Patient Flow Report shows arrival, ready, treatment, and checkout times with wait durations flagged when they run long.
When to use it: run it live on a front-desk or back-office screen through the day to coordinate flow; turn on privacy mode if it faces the waiting room.
To open it, select Practice Pulse at the top of the left sidebar.
The board
Section titled “The board”Watch the Practice Pulse tutorial:
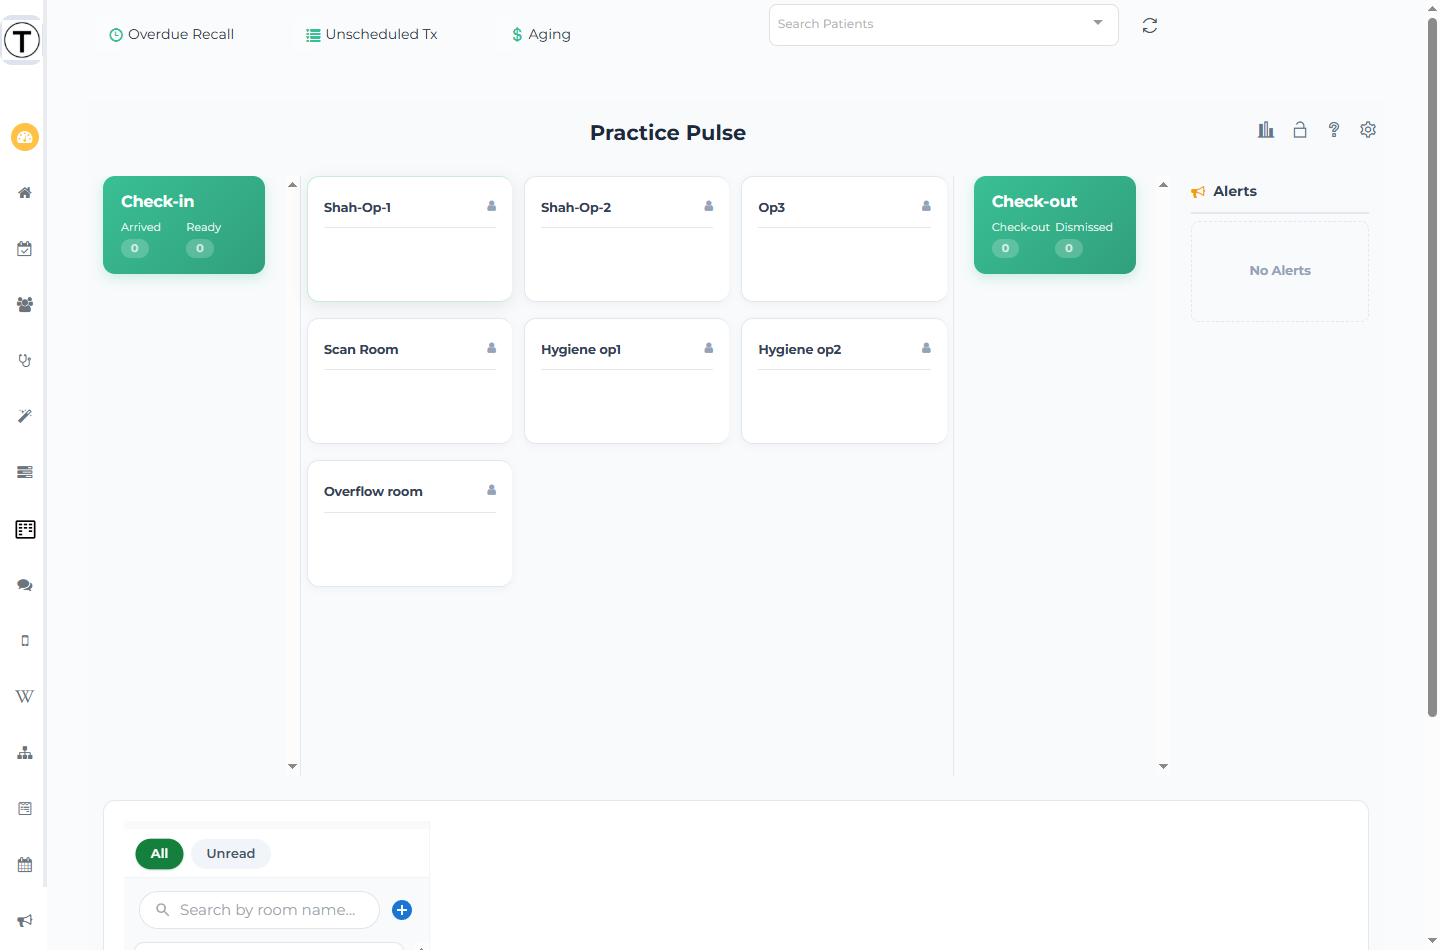
The board is read left to right as a patient moves through the visit:
- Check-in column — every patient who has checked in today, sorted by appointment time. The column header shows two live counts: Arrived (patients in the waiting room) and Ready (patients marked ready to be taken back). Each card also shows the patient’s procedure description and appointment note.
- Operatory columns — one column per chair you’ve configured (for example Shah-Op-1, Op3, Scan Room, Hygiene op1, Overflow). A patient seated in a room appears in that room’s column.
- Check-out column — patients whose visit you’ve closed out. The header shows the day’s Check-out and Dismissed counts.
- Alerts panel — pings sent to teammates appear here with a running timer (see Pinging a room).
Seating a patient
Section titled “Seating a patient”There are two ways to move a patient from Check-in into a chair:
- Drag the card from the Check-in column onto an operatory column, or
- Select the Move to Op (share) icon in the card’s footer and choose a room from the dropdown. The dropdown lists all of your configured operatories, not only empty ones.
Either way, Teamio records the move, starts the patient’s treatment timer, and writes the In Treatment Room status back to Open Dental.
Checking a patient out
Section titled “Checking a patient out”Dragging a card into the Check-out column — or selecting the Check-out (sign-out) icon on a card in an operatory column — opens the checkout route slip. Patients you’ve checked out stay in the Check-out column.
Selecting Dismiss (the × icon) on a Check-out card marks the patient as Dismissed, writes the Dismissed status back to Open Dental, and increments the Dismissed counter. Dismissed patients are not removed from the board — they stay in the Check-out column, fade to a dimmed state, and sort to the bottom. Selecting the Check-out (sign-out) icon on a card already in the Check-out column re-opens its route slip with the previously saved notes loaded.
What each patient card shows
Section titled “What each patient card shows”Every card shows the patient’s name, scheduled procedure, and appointment note. Cards also carry quick-glance action icons — but the at-a-glance alert icons ($, recall, ortho, tasks) appear only when you enable the matching Visual Alert in Setup. Selecting one opens a detail panel from the right without leaving the board:
| Icon | Panel | What it shows |
|---|---|---|
| $ (dollar) | Patient Balance Details | A Guarantor / Balance table. The guarantor name links to the Patient Profile in a new tab. The icon turns red when there’s an outstanding balance, so you can collect at checkout. |
| Recall (circular arrows) | Recall Details | A family table — Name / Recall Scheduled / Recall Due. Unbooked patients read Not Scheduled. Names link to the Patient Profile in a new tab. |
| Magnet (ortho) | Ortho Details | Patient / Age / Ortho Coverage / Age Limit / Ortho Max / Operatory. |
| Tasks | Patient Tasks | Tasks tagged to this patient. You can also add a task here — use @ to assign it and # to tag a patient. |
Other card controls:
- Status color dot (Check-in cards only) — the dot’s color reflects the patient’s Open Dental check-in status; hover it to read the status name.
- Move to Op (share icon, Check-in cards only) — seats the patient (see above).
- × (remove) (Check-in cards only) — takes a patient off the board.
- Check-out (sign-out icon) — appears on operatory-column and Check-out-column cards; opens the route slip.
- Dismiss (× icon, Check-out cards only) — marks the patient dismissed.
- A small gift icon appears on a patient’s card on their birthday — an easy, human touch.
Pinging a room
Section titled “Pinging a room”Each operatory column header has a small person icon. Select it to open the Send Alert modal and ping the provider or assistant you need in that room. The alert appears in the Alerts panel with a running timer, plays the pinged employee’s alert sound, and sends them a browser notification. See Pinging a room: alerts, sounds, and notifications for the full flow and the browser sound-permission gotcha.
Built-in team chat
Section titled “Built-in team chat”When Show Chat is enabled in Setup, a team chat panel sits below the board: All/Unread room filters and a search box on the left, the conversation on the right. Message the floor without leaving Practice Pulse.
Header controls
Section titled “Header controls”The icons at the top-right of the page title give you:
- Report (bar-chart icon, tooltip View Report) — opens the Patient Flow Report, a per-day table of arrival, ready, treatment, and checkout times with wait/treatment durations.
- Privacy toggle (lock icon) — turns privacy mode on and off. With privacy on, cards show each patient’s first name only; last names are hidden. Use it when the board lives on a wall display facing the waiting room. (The tooltip reads Privacy is off. Click to turn it ON and flips when engaged.)
- Help (
?icon, tooltip Learn how to set up and use Practice Pulse) — opens Practice Pulse help. - Settings (gear icon, tooltip Configure Settings) — opens the Configure Patient Flow panel.
Page states you may see
Section titled “Page states you may see”- Skeleton — a placeholder board while data loads.
- Ready to Monitor Patient Flow — shown with a Configure Settings button when no operatories are configured yet.
- Configure Practice Pulse — shown with a Configure Now button when settings have never been saved.