
Precheck settings
Precheck settings is where your practice configures Insurance Verification once. It has two tabs: Automation — everything about when checks run and what they ask for — and Payer mapping, covered in Carriers and payer mapping.
Where: Benefits & eligibility → Precheck settings (top right).
Checks used this month
Section titled “Checks used this month”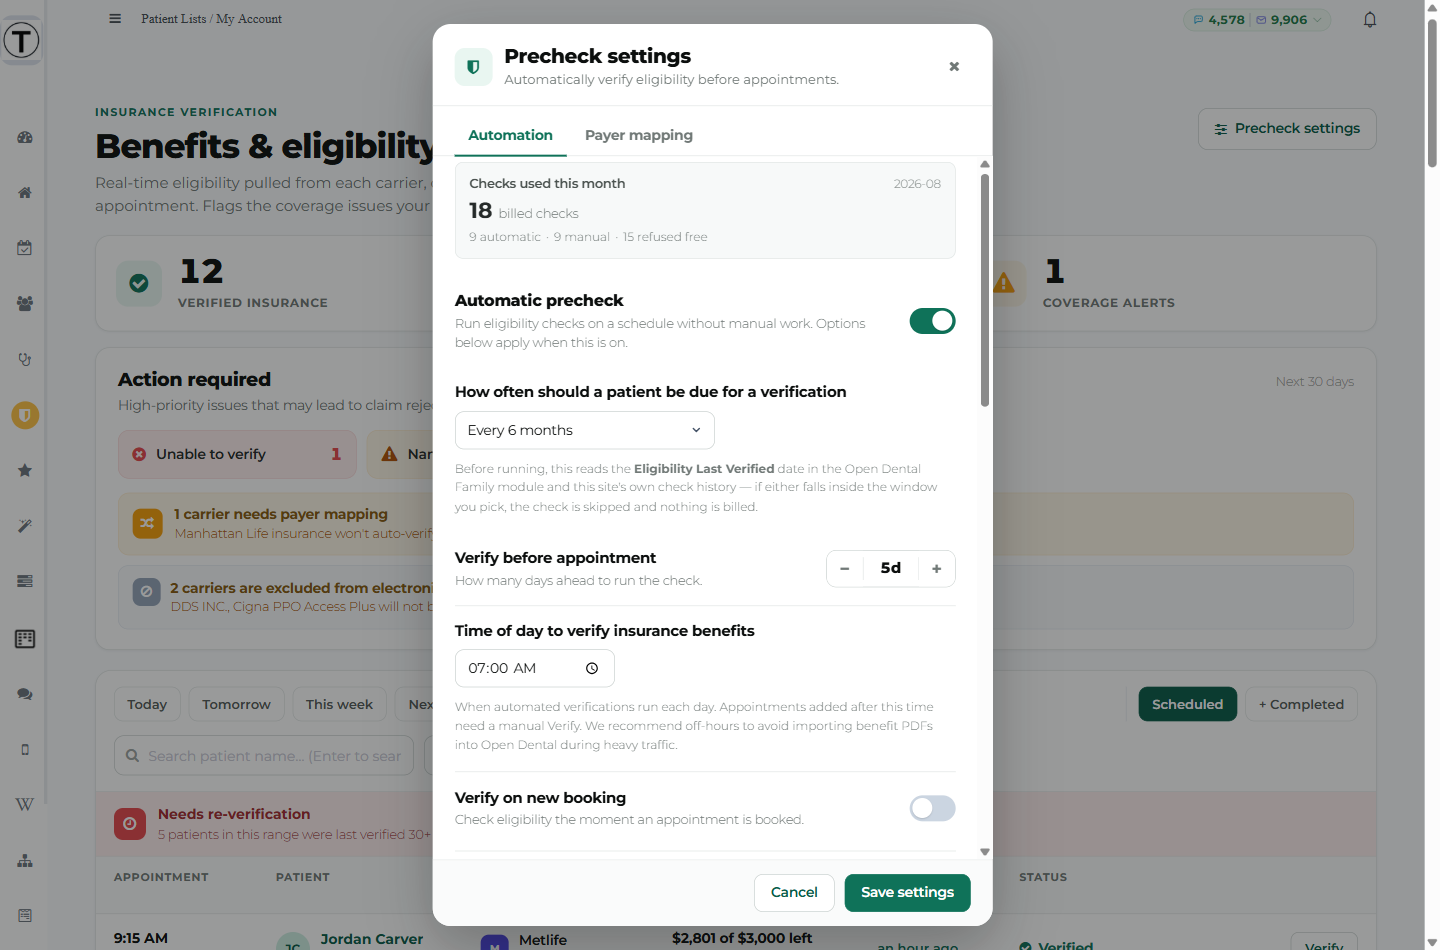
The meter sits at the very top of the tab, deliberately — every control below it changes how much gets spent.
It shows the month, a headline count of billed checks, and a split: {N} automatic · {N} manual · {N} on booking · {N} refused free.
Refused free is the number Teamio declined to send — incomplete records, excluded carriers, payers with no electronic eligibility. Those cost nothing, and a high number there is usually a to-do list rather than a problem.
Sometimes the headline is a range rather than a single number. That happens when a handful of checks can’t be confirmed as billed either way, and the note says so. Teamio would rather show you a range than overstate a figure you’ll be invoiced against.
The same numbers appear in My Account → Credits → Usage report, where you can pick a month and drill into individual checks.

Automation
Section titled “Automation”| Setting | Default | What it does |
|---|---|---|
| Automatic precheck | Off | Master switch for scheduled checks. Everything below it dims when this is off. |
| How often should a patient be due for a verification | Every 6 months | The re-use window. Options run from Before every appointment through Every 24 months. |
| Verify before appointment | 3 days | How many days ahead the run looks. Range 0–14. |
| Time of day to verify insurance benefits | — | When the daily run starts, in your practice’s own time zone. |
| Verify on new booking | Off | Fires a check shortly after an appointment is booked. |
These four are covered in depth — including which one actually controls your spend — in Automatic verification.
Billing provider and procedure codes
Section titled “Billing provider and procedure codes”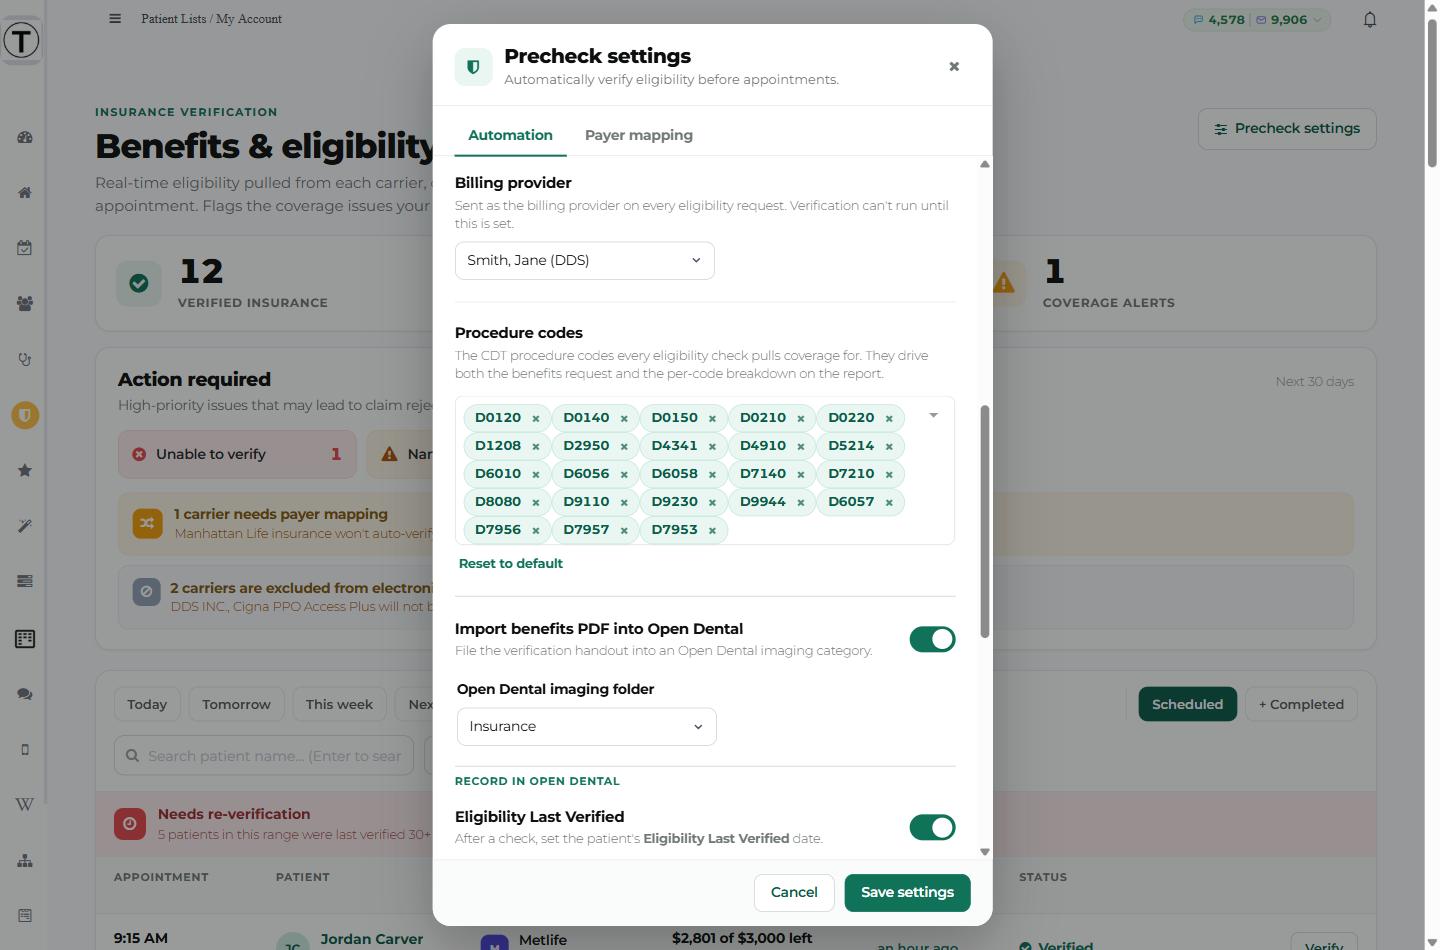
Billing provider
Section titled “Billing provider”Sent as the billing provider on every eligibility request. Verification can’t run until this is set.
This is a hard requirement with no fallback — leave it unset and every check fails, automatic or manual.
Procedure codes
Section titled “Procedure codes”The CDT procedure codes every eligibility check pulls coverage for. They drive both the benefits request and the per-code breakdown on the report.
Teamio ships a curated default set covering exams, X-rays, cleanings, fillings, crowns, root canals, perio, dentures, implants, extractions, ortho and a few adjunctive codes. Search and add your own, or remove ones you never bill. Reset to default puts the Teamio set back.
- The list caps at 50 codes.
- A code you type that isn’t in your Open Dental list can still be added — the hint reads “No matching code — press enter to add it anyway.”
- Empty the list entirely and you’ll see “No codes yet — add at least one above.”
Two things worth knowing:
Adding codes does not cost more. All of them ride on one request, so a 50-code check and a 20-code check are both one billed check.
Editing the list re-renders results you already have. The per-procedure tables in the drawer and the handout are built when you open them, from your current list — so adding a code shows it on existing verifications with no re-check and no new charge.
Import benefits PDF into Open Dental
Section titled “Import benefits PDF into Open Dental”File the verification handout into an Open Dental imaging category.
Off by default. Turn it on and pick an Open Dental imaging folder — the toggle does nothing without a destination. See The patient benefits handout.
Record in Open Dental
Section titled “Record in Open Dental”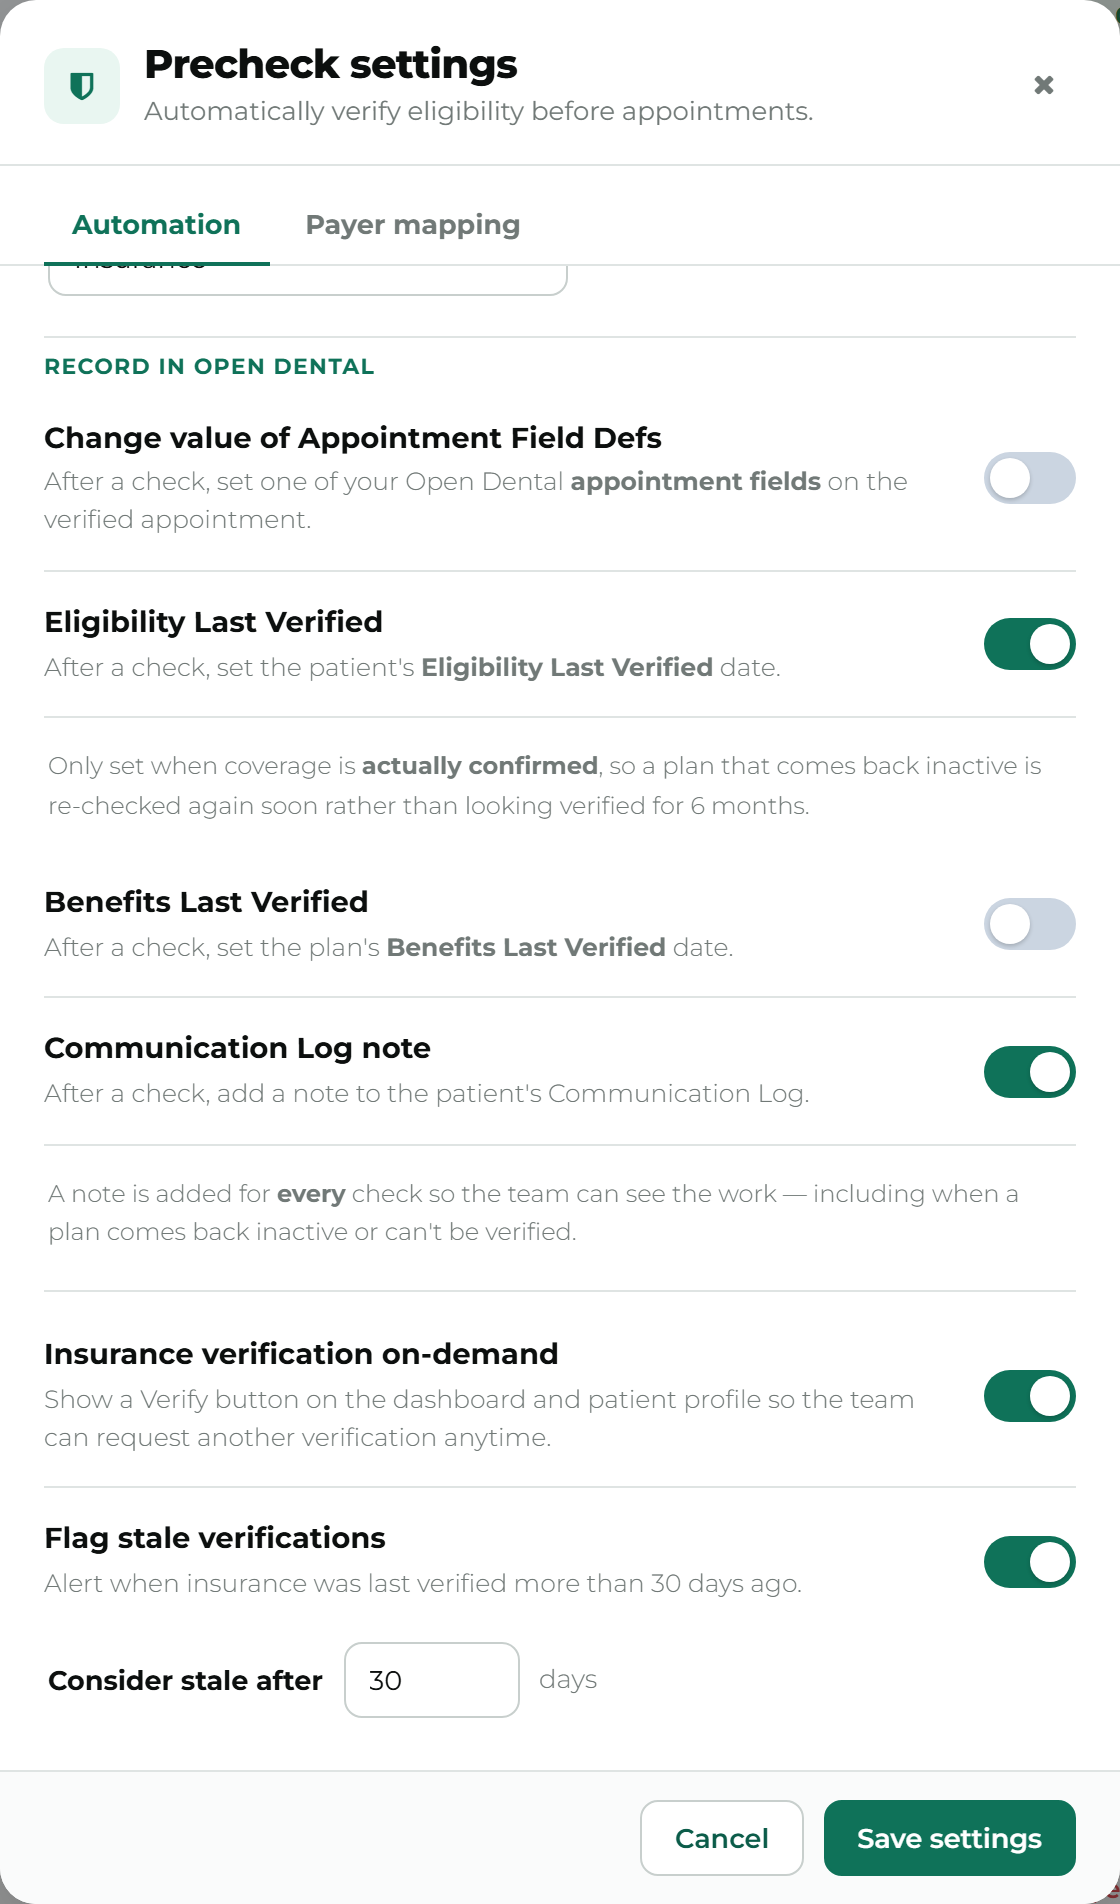
Four independent switches, covered in full in Recording results in Open Dental:
| Setting | Default |
|---|---|
| Change value of Appointment Field Defs | Off |
| Eligibility Last Verified | On |
| Benefits Last Verified | Off |
| Communication Log note | On |
Change value of Appointment Field Defs
Section titled “Change value of Appointment Field Defs”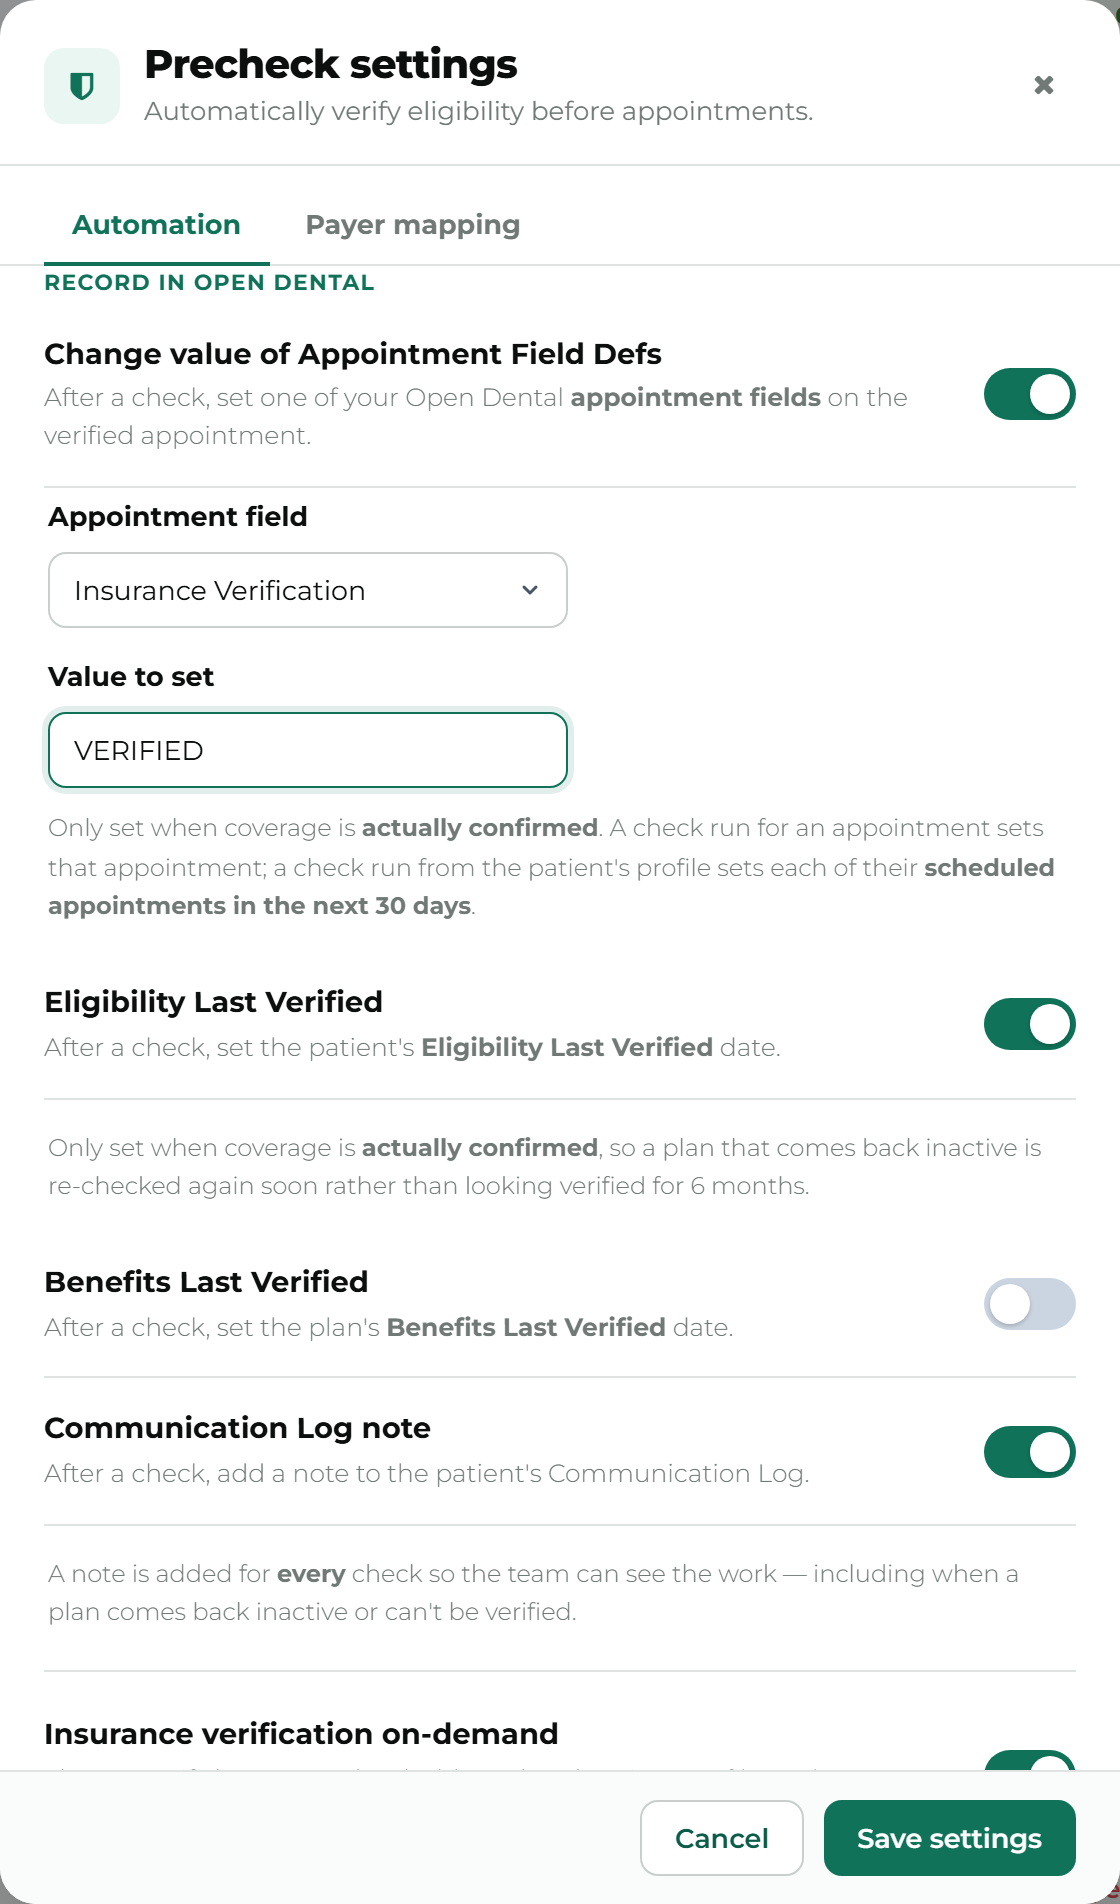
After a check, set one of your Open Dental appointment fields on the verified appointment.
Off by default. Turn it on and two fields appear:
- Appointment field — a dropdown listing your practice’s own Open Dental Appointment Field Defs (the custom appointment fields your practice sets up in Open Dental itself — not something Teamio creates for you). See Set up an appointment field in Open Dental first below if you don’t have one yet.
- Value to set — plain text, for example
VERIFIED.
Both are required while the toggle is on — Save settings stays disabled until you’ve picked a field and typed a value. Plain text only: no < or >, and up to 255 characters.
Like the two dates below, it’s written only when a check comes back verified — coverage actually confirmed. A failed, inactive, or unable-to-verify check leaves the field untouched.
Which appointment gets the write depends on how the check ran:
| The check ran from | What gets the field |
|---|---|
| A dashboard row, the automatic nightly run, or Verify on new booking | Just that one appointment |
| The patient’s profile, or a patient search on the dashboard (no appointment attached) | Every one of the patient’s scheduled appointments in the next 30 days — nothing is written if there are none |
An appointment that’s since been deleted in Open Dental is simply skipped. Like every write-back, it travels through your practice’s Teamio sync — see Nothing is reaching Open Dental at all if writes aren’t showing up.
Set up an appointment field in Open Dental first
Section titled “Set up an appointment field in Open Dental first”Change value of Appointment Field Defs writes into a field your practice defines in Open Dental — Teamio doesn’t create one for you. If your practice hasn’t set one up yet:
- In Open Dental, go to Main Menu → Setup → Appointments → Appointment Field Defs.
- Add a new field def — for example, name it Insurance Verification.
- Choose a field type: Text (staff can type anything) or Pick List (staff choose from a preset list of items you enter, one per line).
- Save it in Open Dental, then reopen Precheck settings in Teamio — your new field appears in the Appointment field dropdown.
See Open Dental’s own manual for the full picture: Appointment Field Defs.
The last two toggles
Section titled “The last two toggles”Insurance verification on-demand
Section titled “Insurance verification on-demand”Show a Verify button on the dashboard and patient profile so the team can request another verification anytime.
On by default. Turning it off is a genuine kill switch — the Verify buttons disappear and the server refuses manual checks, even if someone finds another way to ask for one. Use it if you want automation only, with no per-click spending.
Flag stale verifications and Consider stale after
Section titled “Flag stale verifications and Consider stale after”On, at 30 days. Together they drive the red Needs re-verification banner on the dashboard.
Troubleshooting
Section titled “Troubleshooting”I can’t find the Precheck settings button
Section titled “I can’t find the Precheck settings button”It’s Admin / Super Admin only. Ask an admin at your practice, or Teamio.
My changes didn’t stick
Section titled “My changes didn’t stick”Select Save settings before closing. Clicking outside the modal with unsaved edits prompts you first — choose Keep editing to go back.
The imaging folder dropdown is empty
Section titled “The imaging folder dropdown is empty”Teamio reads those categories from your Open Dental. If nothing is listed, your practice’s Open Dental has no imaging categories set up, or the connection is down.
The provider dropdown doesn’t list anyone
Section titled “The provider dropdown doesn’t list anyone”Same cause — Teamio reads providers from Open Dental. If it’s empty, contact Teamio.
The appointment field dropdown is empty
Section titled “The appointment field dropdown is empty”If it says “No appointment fields found in Open Dental — create them in Open Dental first,” your practice hasn’t created any Appointment Field Defs yet — see Set up an appointment field in Open Dental first above. If a field you’d previously chosen shows (not found) instead, it was deleted in Open Dental since you picked it — choose another.