
Mapping procedures to consent forms
Tell Teamio which consent form goes with which procedure — once — and it will hand your team the right consent for whatever is on a patient’s appointment, with the tooth numbers already filled in.
Why this belongs in onboarding
Section titled “Why this belongs in onboarding”Nothing is mapped out of the box. Until someone does this, Teamio has no way to know that a filling needs your fillings consent and an extraction needs your extraction consent.
Nothing breaks in the meantime — consent forms still work exactly as they always did. You just don’t get the useful part: procedures show as No consent form mapped, and a consent form’s tooth-number field falls back to listing every tooth on the appointment rather than only the ones that consent covers.
Do it once, near the start of onboarding, right after the practice’s consent forms are built.
Set up the mapping
Section titled “Set up the mapping”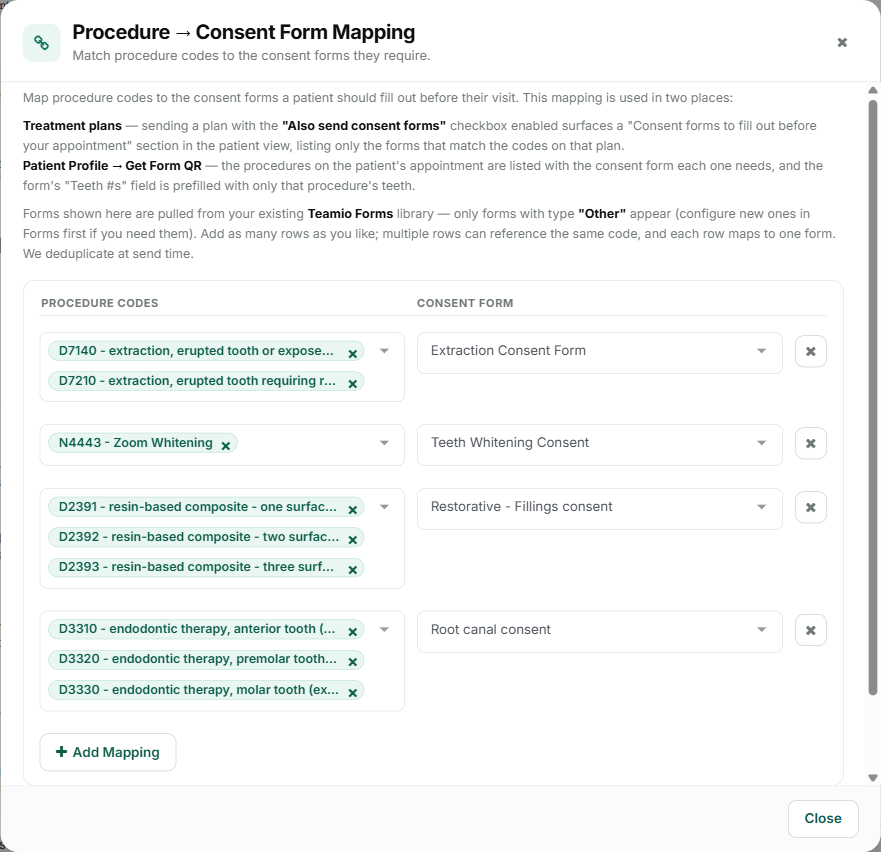
- Go to Forms.
- Select the link icon beside the settings cog (tooltip Map procedure codes to consent forms). The Procedure → Consent Form Mapping dialog opens.
- Select Add Mapping to start a row.
- Under Procedure codes, pick every code that should trigger this consent. Type to search — codes are listed as the code plus its description, so
D2393reads D2393 - resin-based composite - three surfaces, posterior. - Under Consent form, pick the form those codes require.
- Repeat for each consent form the practice uses.
- Select Save. The status line reads Saving… and then Saved, and settles on All changes saved.
Group codes the way the practice actually thinks about them. One row per consent form is usually right — all your posterior composite codes on the fillings consent, all your extraction codes on the extraction consent, and so on.
Make the tooth numbers fill in automatically
Section titled “Make the tooth numbers fill in automatically”The mapping decides which consent a procedure needs. If you also want the tooth numbers filled in for you, the consent form needs somewhere to put them:
- Edit the consent form (Editing a form).
- Add or select a text field — something like Teeth #s or Tooth No.
- In the control’s settings, tick Pre-fill with Teeth #‘s.
- Save the form.
That checkbox only appears on text fields in forms whose type is Other, which is what consent forms are. See Configuring a control.
Without it the mapping still does its job — Teamio still shows you the right consent for each procedure. There’s just no field for the tooth numbers to land in.
Tips and common questions
Section titled “Tips and common questions”- “Can two consents share a procedure code?” Yes. Add a row for each. A code can point at as many consents as it needs, and duplicates are removed automatically.
- “Can one consent cover several codes?” That’s the normal case — put all the codes on one row. An extraction consent covering both a simple and a surgical extraction code produces a single consent listing both teeth, not two separate ones.
- “My form isn’t in the dropdown.” Only forms of type Other appear. Check the form’s type in Editing a form.
- “The procedure list is empty.” The picker reads your Open Dental procedure codes. If it stays empty, the codes haven’t loaded yet — reopen the dialog.
- One mapping, two places. The same mapping drives both the consent list on a patient’s appointment and the consent forms bundled with a treatment plan — see Sending a plan to the patient. Set it up once and both follow.
Related
Section titled “Related”- Getting a consent form for an appointment — the everyday use of this mapping
- Creating a form — building the consent forms themselves
- Configuring a control — where Pre-fill with Teeth #‘s lives
- Treatment Presenter settings — the same mapping from the Tx Presenter side
- Forms permissions by role