
Setting up online booking
Online booking lets patients pick their own appointment time on a public, practice-branded page. Verified bookings land on your Open Dental schedule automatically. This article covers the General settings and the dashboard; appointment types and multi-location setup have their own pages.
How the page is laid out
Section titled “How the page is laid out”Open Online Appointments from the sidebar. The page has two pill tabs at the top:
- Online Appointments — the bookings dashboard (default, read-only).
- Settings — a left-hand nav with three sections: General, Appointment Types, and Preview Booking Page.
Multi-location practices also get a Configuring for: location selector and a Copy from another location button at the top — see Online booking for multi-location practices.
General settings
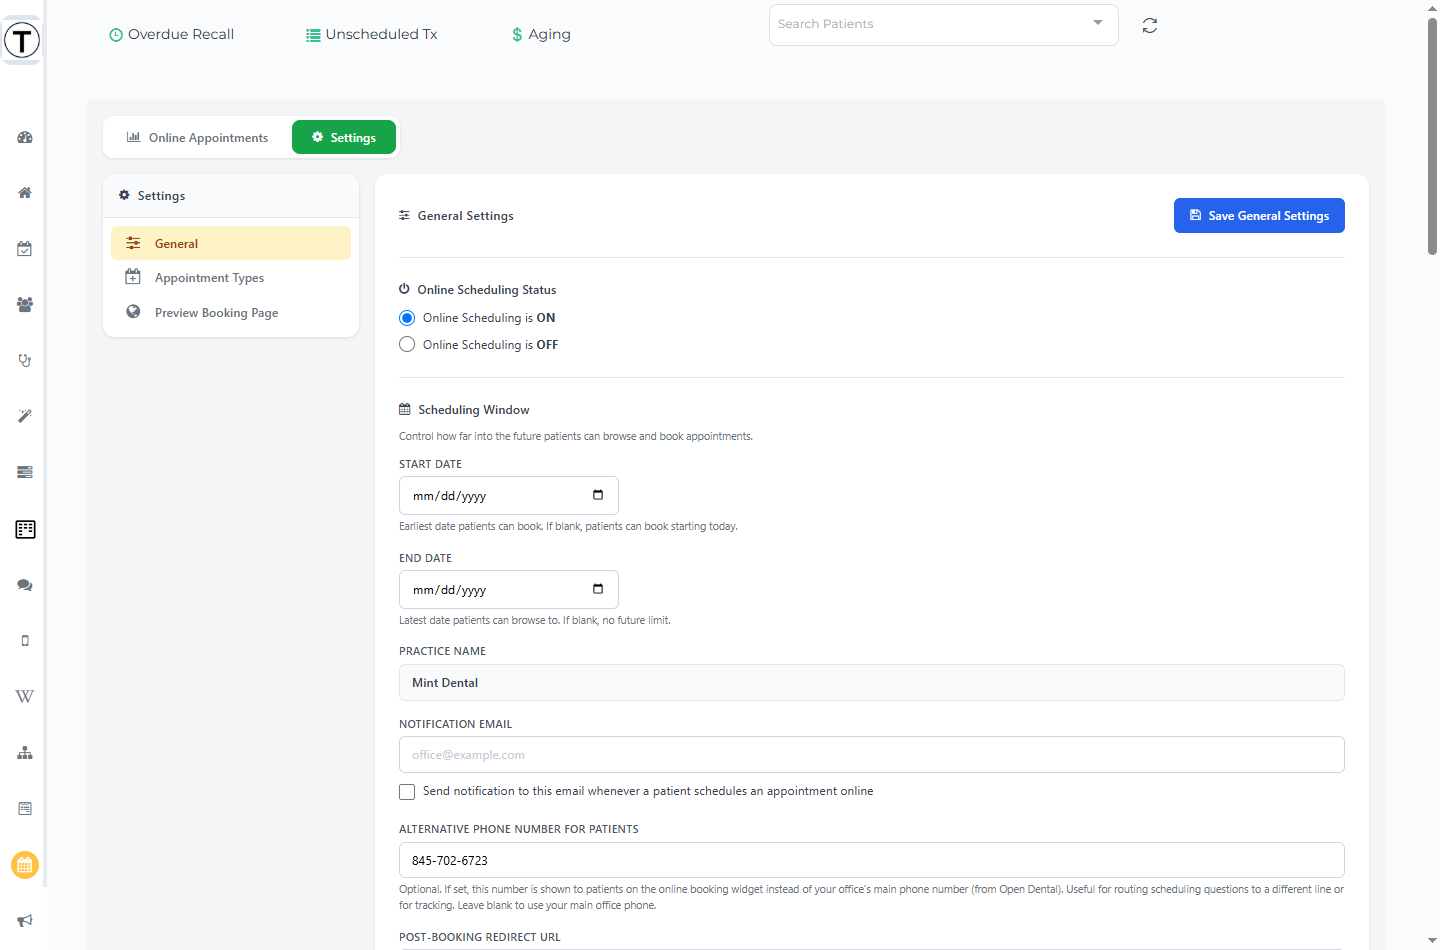
Section titled “General settings”Select the Settings tab; General opens by default.
Turn scheduling on or off
Section titled “Turn scheduling on or off”Online Scheduling Status is a radio pair — Online Scheduling is ON / Online Scheduling is OFF (not a toggle switch). When it’s OFF, a warning reminds you that patients visiting your booking link will see a message to call your office instead, so the link stays safe to leave published while you finish setup.
Scheduling window
Section titled “Scheduling window”Two date inputs control which dates patients can browse, each with a Clear button:
| Setting | Default (blank) | Effect |
|---|---|---|
| Start Date | Today | Earliest bookable date. Set it in the future to delay when bookings can begin (for example, after a software rollout). |
| End Date | No limit | Latest date patients can browse to. Set it to cap how far ahead they can book. |
| Automatically extend the booking window | Off | Check it and pick 1–6 months. Every day, patients can book up to that many months ahead (same day of the month; a window that starts Jan 31 ends Feb 28). Your typed End Date is kept but ignored while this is on. |
Turn on automatic extension if you’re tired of remembering to come back and push the End Date out — once it’s on, the window keeps rolling forward on its own and there’s nothing left to maintain.
Practice info and notifications
Section titled “Practice info and notifications”- Practice name — read-only; pulled from your Open Dental site record, not edited here.
- Alternative Phone Number for Patients — optional. Overrides the Open Dental main number shown on the booking widget if you want patients to call a different line.
- Notification Email plus its checkbox — Send notification to this email whenever a patient schedules an appointment online. Tick it and enter an address to get an alert on every booking.
Insurance and provider network status
Section titled “Insurance and provider network status”- Insurances Accepted — a multiselect of the plans you take. Selecting any insurances here adds an insurance step to the patient’s booking flow.
- Provider Network Status — a checkbox grid marking each provider in-network or out-of-network per insurance.
- Patient Display Options — two checkboxes: show the network-status chart to patients, and show network status on the provider-selection screen.
How bookings enter Open Dental
Section titled “How bookings enter Open Dental”- No Fee Code to use when Inserting Appointment into Open Dental — required. Pick a zero-fee procedure code. Online bookings insert with this code so they never post a fee; the appointment type’s real procedure codes go into the appointment note, not onto the appointment as billable procedures.
- Appointment Open Dental Confirmation Status — a dropdown of your Open Dental confirmation definitions. New online bookings come in with this status.
- Appointment Confirmation Message for Patients — a dropdown of Wiki pages tagged
online-appointments. The default is Teamio’s built-in message. Your chosen page is the SMS the patient gets after booking, and it can use variables such as{{patient_first_name}},{{apt_date}},{{online_apttype}},{{apt_provider}},{{site_name}}, and{{site_officephone}}. - Don’t Schedule in these “Blocks” — checkboxes for Open Dental blockout types the booking page must never schedule into (lunch, meetings, doctor-only blocks, and so on).
Patient-facing branding
Section titled “Patient-facing branding”Under Patient-Facing Branding, set your Primary Color and Secondary Color with the color pickers, a Logo URL, and a Background Image URL. The Logo and Background fields show a live preview so you can confirm the image loads before patients see it.
Select Save General Settings when you’re done — settings here are not saved automatically.
Appointment types
Section titled “Appointment types”The Appointment Types tab is where you define exactly what’s bookable and which operatory and provider each type lands on. Because that mapping is what makes a booking land correctly in Open Dental, it has its own article — see Appointment types. That’s also where you set a per-type Post-Booking Redirect URL to your own thank-you page, which lets you track online-booking conversions with a marketing pixel.
Preview, then go live
Section titled “Preview, then go live”Select Preview Booking Page in the settings nav to see exactly what patients will see.
It’s a live embedded copy of your real booking page (with an amber Preview Mode banner), so you can click through every step. Booking is disabled in preview, so nothing you do here creates an appointment or sends a text. Use Refresh after changing a setting, or Open in New Tab to view it full-screen.
When everything looks right, set Online Scheduling Status to ON and share your booking link.
The dashboard
Section titled “The dashboard”The Online Appointments tab shows your results.
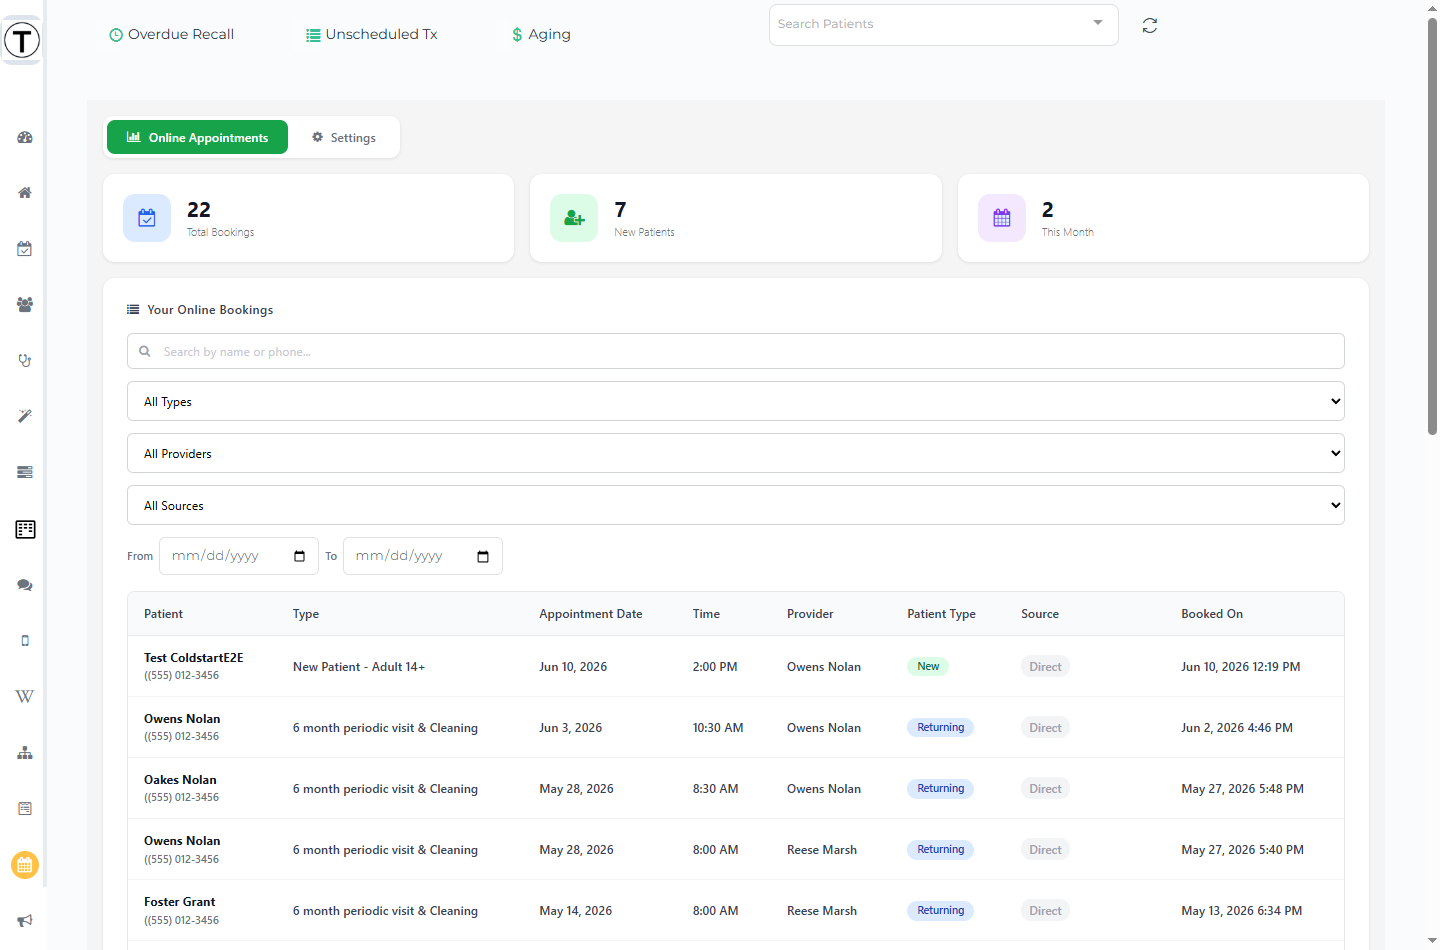
- KPI cards — Total Bookings, New Patients, and This Month.
- Your Online Bookings table — patient, appointment type, date/time, provider, New/Returning, Source, and Booked On. Untagged bookings show a gray Direct badge; tagged bookings show their UTM Source/Medium (hover for the full Source / Medium / Campaign / Content detail).
- Filters — search by name or phone, plus All Types, All Providers, All Sources, and a From / To date range.
- The table paginates at 25 per page (Prev/Next). When nothing matches, it shows No online bookings found.
Troubleshooting
Section titled “Troubleshooting”Patients see a “call the office” message instead of times
Section titled “Patients see a “call the office” message instead of times”Online Scheduling Status is set to OFF, or today is before your Start Date. Set the status to ON and clear or adjust the Start Date.
The calendar shows no bookable dates
Section titled “The calendar shows no bookable dates”Your End Date is in the past, or your Start Date is later than the rolling end date set by automatic extension — either way, no day on the calendar is currently bookable. Patients no longer see a calendar full of greyed-out days; they see an “Online Booking Not Open Right Now” message asking them to call your office instead. Clear or adjust the Start/End Date, or turn on Automatically extend the booking window so the window never closes again.
Bookings post a fee in Open Dental
Section titled “Bookings post a fee in Open Dental”The No Fee Code isn’t a zero-fee code. Pick a genuinely zero-fee procedure code so insertions never post a charge.
A type never appears for patients
Section titled “A type never appears for patients”The type may be hidden, have no operatory-provider mapping, or be restricted to a patient group that doesn’t match — see Appointment types.