
Setup: configure patient flow
Practice Pulse works by reading each patient’s Open Dental appointment status and placing them in the right column. The one-time setup is teaching it which of your statuses mean what — plus the alerts, operatories, and shortcuts your team uses. Everything below lives in the Configure Patient Flow panel. Open it from Practice Pulse by selecting the gear icon (tooltip Configure Settings) at the top-right of the page title.
The panel has a header with Save and Cancel buttons. Save validates your entries, shows a “Settings saved successfully!” toast, and closes; Cancel (or the × Close) discards your changes.
1. Status Settings
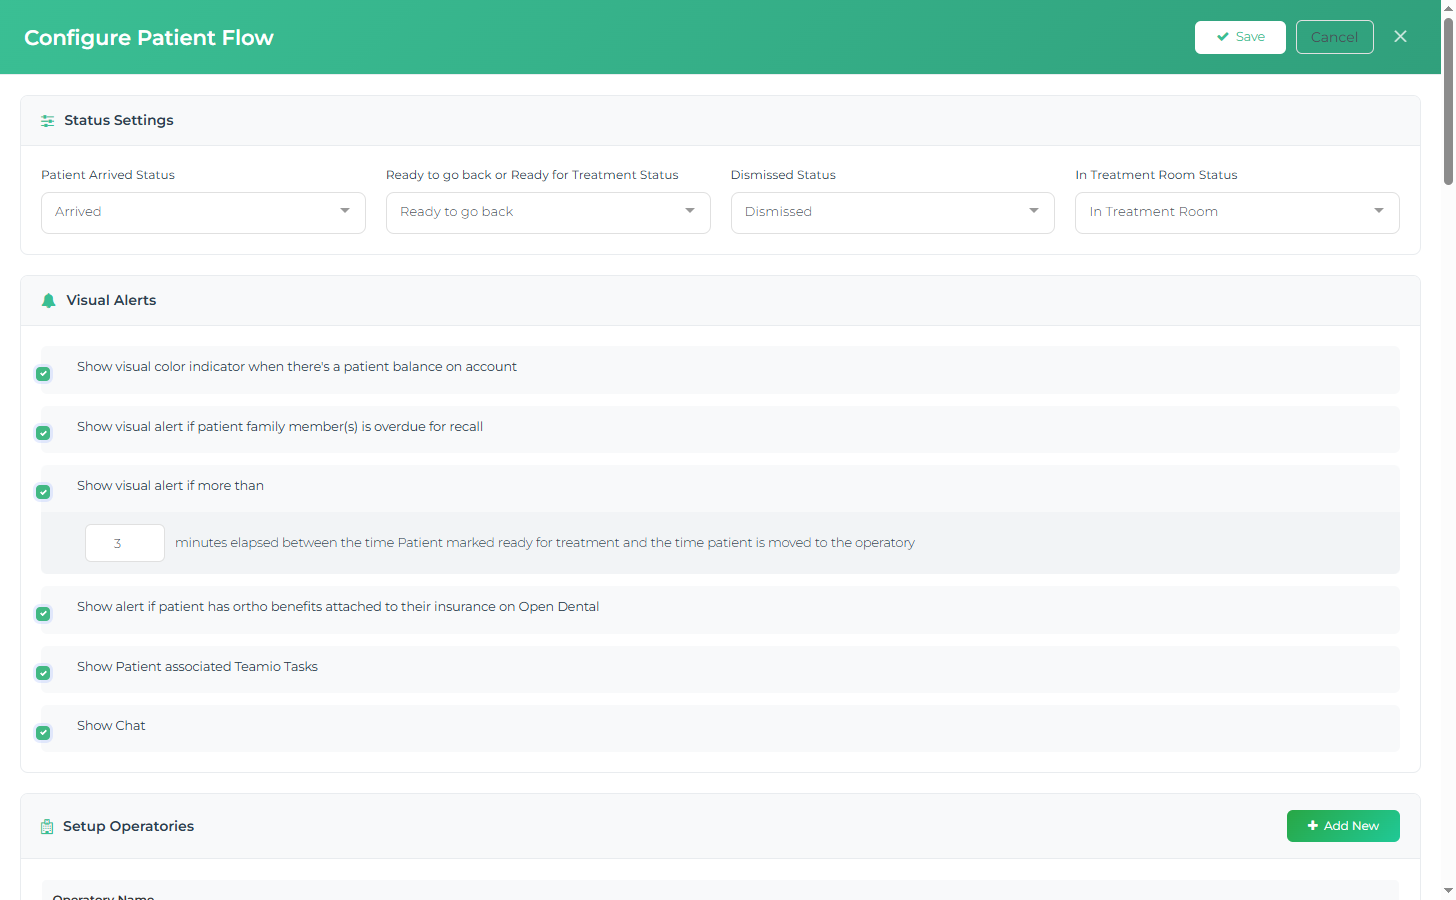
Section titled “1. Status Settings”Map each Practice Pulse stage to the matching Open Dental status your office already uses. Each field is a dropdown that lists your live Open Dental statuses, in this order:
- Patient Arrived Status — “checked in / in the waiting room”; counts toward Arrived in the Check-in column.
- Ready to go back or Ready for Treatment Status — counts toward Ready and lets the patient be moved to a chair.
- Dismissed Status — the patient has left; used by the Dismiss action.
- In Treatment Room Status — written back to Open Dental when you seat a patient in an operatory.
Because Practice Pulse reads these live, your team keeps updating status in Open Dental exactly as they do today and the board moves on its own — no double entry. Moving a patient on the board writes the matching status back to Open Dental, so the sync runs both ways.
2. Visual Alerts
Section titled “2. Visual Alerts”Toggle which at-a-glance indicators appear, so the board surfaces exactly what your team acts on. The exact checkbox labels are:
- Show visual color indicator when there’s a patient balance on account — the $ icon and balance panel on cards.
- Show visual alert if patient family member(s) is overdue for recall — the recall icon and panel.
- Show alert if patient has ortho benefits attached to their insurance on Open Dental — the ortho (magnet) icon and panel.
- Show Patient associated Teamio Tasks — the tasks icon and panel.
- Show Chat — whether the embedded team-chat panel appears below the board.
This section also holds the wait alert setting: “Show visual alert if more than [N] minutes elapsed between the time Patient marked ready for treatment and the time patient is moved to the operatory.” When a patient has been Ready longer than your N minutes, their Check-in card shows a red Waiting: X minutes box (for example Waiting: 14 minutes or Waiting: 1 hours, 5 minutes). There is no page-level banner — only the on-card box. Save requires a value here, or it warns “Please enter a value for how long to wait for visual alert?“
3. Setup Operatories
Section titled “3. Setup Operatories”Choose which chairs appear as columns on the board:
- Rooms that sync from Open Dental can be renamed but not deleted (no trash icon).
- Add New creates a blank-name, Teamio-only room — useful for spaces Open Dental doesn’t track (for example Overflow, Scan Room). Only Teamio-added rooms show a trash icon; deleting one prompts “Are you sure you want to to delete this operatory?“
4. Alert Settings For Employees
Section titled “4. Alert Settings For Employees”Give each provider/employee a color and an alert sound:
- Colors pre-fill from each provider’s Open Dental provider color; the color tints that provider’s patient cards so you can read the room at a glance.
- The Sound dropdown offers a fixed list of ten sounds: call-to-attention, elevator-ding, error, success, wrong-answer, simple-notification, sound-alert, beep-beep, bell, notification. A play button previews each one.
If your browser hasn’t granted audio permission yet, the play button may pop “Please enable Sound for this site first…” — allow sound for the site and try again.
5. Custom Alerts
Section titled “5. Custom Alerts”Define the ping shortcuts that appear in the Send Alert modal. Each row has a Select Team Member dropdown and an Alert Text input (“Enter alert text”) — for example “Doctor needed” tied to Dr. Shah. Use the trash icon (with a confirm prompt) to remove a row and Add New to add more. See Pinging a room for how these are used.
6. Post-op Calls
Section titled “6. Post-op Calls”Set the daily follow-up-call email for your providers. The prompt reads “At what hour do you want the emails to go out to the providers for the patients to be called?” — the time picker offers 4:00 PM through 11:00 PM in one-hour steps only. Enter each provider’s email address. This is what powers the checkout slip’s “add this patient to the provider’s follow-up-call list” checkbox; until the send hour is set, that checkbox stays disabled.
7. Quick Notes
Section titled “7. Quick Notes”Build the one-tap notes that appear on the checkout route slip:
- Add New Category creates a category. Each category has an editable title, an × to delete it, and a + (Add sub-heading) button.
- Each item has a Sub-heading name and an Auto notes input (new items default to “sub-heading” and “Your Auto Notes goes here”), plus its own × to remove it.
- The Auto notes text is what gets appended to the checkout Notes box when that quick note is ticked.
Set these up around your real checkout outcomes so closing a visit is mostly clicks.